Thursday 24 June 2010

Win your own fingerprint plectrum.......


Win your own sterling silver fingerprint plectrum.

This is a free to enter competition, and all you have to do is leave a message here on this blog entry, telling me why you would find this the perfect gift.

The winner will be picked at random on July 10th 2010, 17.00 GMT.

I will then require your fingerprint via e-mail or through the post and I will engrave it and a name onto one of my handmade sterling silver plectrums and send it to you , wherever you are in the world.

Couldn't be more simple, good luck.

Monday 21 June 2010

Angel wings in sterling silver.


I was asked by a lovely lady to make a pair of Angel wings in stelring silver to serve as a pendant in memory of her mother.

This was a delightful commission to create and I do hope that this bespoke design brings much comfort.

Thursday 17 June 2010

Fingerprint keyfob.


Joanne came into my shop and ordered this funky present for her hubby. A set of sterling silver discs, with her kids fingerprints on. Each fob is hallmarked and on the reverse side carrys the childs name and date fo birth.

This was great fun to make and great fun to get the kids to sit still to take their prints. In truth, they were all as good as gold, probably trying to work out why this strange man was taking their prints!

Fingerprint jewellery is certainly very popular at the moment. Personally I don't use precious metal clay (PMC) for this task as it is too soft. The fine silver that is produced is not suitable to the wear and tear that these items get and you would soon have the fingerprint disappear.

I recently had someone come into my shop with some PMC cuff links they had bought elsewhere and the prints had all but gone.

Wednesday 16 June 2010

Part TWO. Hand engraving a wax seal (coat of arms or family crest)


So the shield was engraved to a nice depth and an impression was taken to ensure it all looked OK.

This particular design, has a horizontal bar, which was engraved in and the depth checked with the plasticene.


Next to bew engraved was the three diamond shapes. Again, the plasticene is used to check the impression.


I missed aphoto, but you can see that I have now engraved a helmet from a suit of armour.

I use the plasticene by pressing it onto the surface of the metal. This leaves behind a film of grease onto the metal. You can now draw in pencil onto the grease and it leaves a nice crisp pencil outline. Once I am happy with the scroll, I then engrave the pattern on one side.


I then mirror the scroll pattern onto the other side and engrave that as well. Once I am happy that all the elements work, it is then ready to be burnished, polished and mounted onto a handle.


Here is the finished piece, mounted onto a handmade teak handle. I can hand engrave your own coat of arms or crest to make your own unique gift. Click here for details.

Tuesday 15 June 2010

Part ONE. Hand engraving a seal. ( A coat of arms or family crest)

This is what I am going to be engraving today. It is the Parry coat of arms. I will make some modifications to the artwork, but in essence I will be engraving my family coat of arms onto a piece of silver.

I will then mount this on a wooden handle, to make a "Parry" seal which can be used with melted wax. The tradition of sealing letters with melted wax, and using your official seal dates baack hundreds of years.

You can either engrave the entire coat of arms, just the crest. The crest is usually a helmet or an animal, or just the name with some swirling scrolls. Ultimately, your official seal, is whatever you want it to be. So nowadays you could have an X-Box and HD TV if you so wished it. These coat of arms however are just traditional.

These designs can be engraved onto signet rings, cuff links, wax seal stamps.....


So this post might take too long in one hit, so I will star and ight carry it over onto another day.
the picture above is my engravers ball vice. it is really heavy so it doesn't budge when you are working on it. It grips the piece you are engraving and at the same time, allows you to rotate the whole top section.

It is a bit like a bowling ball sitting on a ring, you can angle it, rotate it, and this version even allows you to re-centre it, but that is for the real engraving nerd!

The toothbrush in the picture, is because I like minty breath as I work. OK, it is actually just a really handy little brush to clean the piece as you go.


The picture above is a little homemade rack holding my different sized engraving tools. Each is slightly different in width and shape. I have colour coded the handles so I can tell them apart easier.


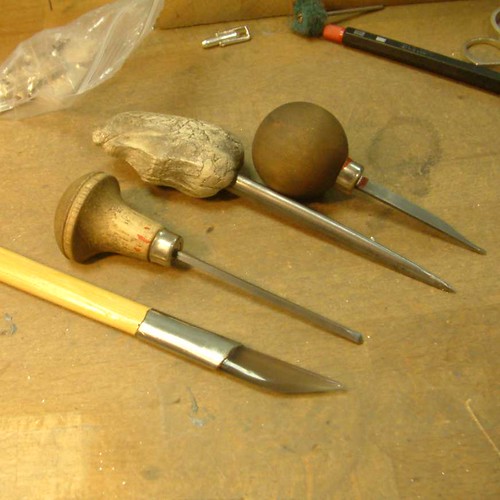
A close up of some of my tools, that I use to engrave. Top to bottom, we have a 1.2mm wide flat engraver, a steel burnishing tool with homemade ergonomic handle made from Jet Set from Rio Grande. A square engraver, used to do line work and script letters and finally an agate burnishing tool. used to smooth metal and give a high polish.


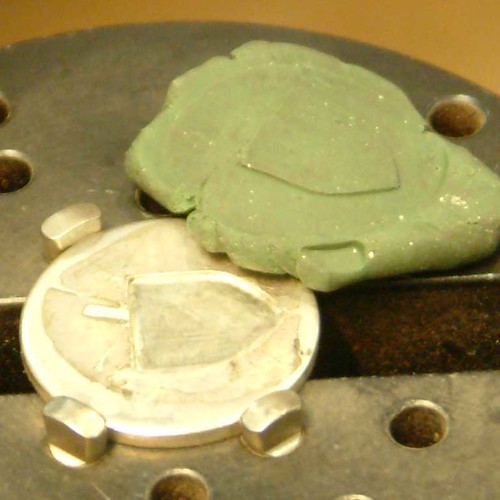
Here is the piece that I am working on. A 20mm circle of sterling silver. I have marked out a simple shield design and using the tools above, I have engraved a shallow depth of about 0.5mm.

As I progress, I use a piece of modelling clay (plasticene), to take an impression. This helps me to see how neat the edges are and how deep the engraving is.

Please come back to see the next stages and feel free to leave a comment.

Monday 14 June 2010

Custom wedding rings.


Of course, one of my passions is making custom wedding rings.

For me, there is an absolute thrill in taking a clients brief, and creating and designing the exact ring that the client is after. As a designer, it is not about trying to predict future trends, it is all about teasing out of a client, what turns them on. What metal and what style they like.

Some clients are easier to workwith than others, that is a given. However, with enough help, most clients suddenly realise, what it is that makes their dream ring. Sometimes it can be as simple as a chunky band with a hand engraved Roman font.

It is the making of custom wedding rings that for me, eclipses all other aspects of a wedding. Of course, I am going to say that, I am a jeweller. But name anything else that has the longevity of a wedding band from a wedding day. Sure, pics hang around in an album. The dress will be packed away in the attic. The marriage certificate ends up in a shoe box, but it is the wedding band that quite literally grows with you. That sees the good times and bad.

You will not make any other purchase that will stay with you the entirety of your life. Cars and houses will come and go. So give your wedding band some extra thought, and have one handmade by someone who really cares.

Sterling silver golf ball marker


A young lady came into my shop today. Just so happens she is getting married on Saturday. She was with her friend, and they both perused the shop. whilst they were looking at the jewellery cabinets, they happened across my sterling silver golf ball markers.

For those not in "the know", when you are on the green, waiting to sink your putt, you take turns. The ettiquette, is that he who is furthest from the hole, takes their shot first, and so on, until all balls are sunk. If your ball is in the way, you are supposed to mark where the ball lies, and temporarily remove your ball.

So these sterling silver golf ball markers are a touch of luxury, to give to that golf fanaticwho already has it all.

They can be personalised, and in this case, the young lady wanted just the date hand engraving onto the marker.

Now, it has to be said, that I love hand engraving. There is something really pleasing about gouging out the metal, from a highly polished surface, leaving a beautiful bright cut engraving. This is the sort of finish that a machine just can't replicate. God, I hate those machine engravers with a passion. The quality of line that a machine leaves is just so poor.

So, I simply rub some modelling clay (plasticene) over the shiny metal. This leaves a greasy film over the metal. Then with a crisp 0.3mm mechanical pencil, I draw the lettering on. The pencil line, stands out brilliantly on the greasy surface. If I make a mistake with the pencil, I simply rub my finger over the surface and start again.

Once I am happy with my artwork (it can easily be brushed off by mistake, so great care is now required not to accidentally smudge it). I then clamp th epiece in my ball vice and engrave away by hand. (For those who know the skill, I am a pusher, I don't use an air engraver)

So, this is the result of a young lady treating her future hubby to a little bit of luxury, just god help him if he loses it in the club house.

If you'd like to order one as well, please click here to visit my shop.

Sunday 13 June 2010

Hand engraved money clip


Another recent little commission. A fingerprint hand engraved on to a handmade sterling silver money clip, complete with "Rob" bright cut in an old fashioned script.

There is something really rewarding about hand engraving a piece of jewellery. If you have an idea, drop me a line of you can order your own version here.

Saturday 12 June 2010

Fingerprint on a silver guitar plectrum


Just completed this fingerprint, hand engraved onto a sterling silver guitar plectrum.

If you are interested, you can order your very own by visiting my shop here.